Contents
1. PREPARATIONS AND SETUP
 1.1 RETRIEVE YOUR DATA
1.2 VIPERS VMMPS CONFIGURATION FILES
2. MASK CONSTRUCTION
2.1 VMMPS: CROSS CORRELATION
2.2 VMMPS: ASSIGN SLITS
3. FINDING CHART CONSTRUCTION
3.1 VMMPS: CREATE THE FINDING CHARTS
4. PACKAGING AND UPLOAD
4.1 FILE PACKAGING AND UPLOAD
The VIPERS VMMPS mask preparation is done separately for each quadrant and consists of four individual steps: 1. Data retrieval and setup, 2. Cross correlation and slit assignment, 3. Creation of finding charts, and 4. Data packaging and upload of the final mask files to the VIPERS web site repository. We recommend to use VMMPS version 3.24.
We advise to proceed with the following strategy:
- REPEAT step 2 for all quadrants of a single pointing. Then EXIT VMMPS (each time you complete one single quadrant).
- Afterwards exit and RE-START VMMPS.
- Continue with step 3 in construction the finding charts for all quadrants of a pointing.
- Finally, create a data package and submit all final mask files to the VIPERS web site repository. NOTE: The strategy is necessary in order to avoid the "checksum" problem that occurs during the upload of VIPERS masks with the ESO P2PP software by the PI.
- NOTE: VMMPS version 3.28: This version does not automatically save the WxPyyyQz_vm.cat_tmp file. Before you exit VMMPS, you must save the WxPyyyQz_vm.cat_tmp file! If you are using VMMPS version 3.24 you can safely omit this part.
1. PREPARATIONS AND SETUP
1.1 RETRIEVE YOUR DATA
- Connect to the Marseille VIPERS database:
Masks.->preimaging
NOTE: THE SLASH AT THE END OF THE URL IS MANDATORY!
username: obsVipers
password: ven0m (NOTE THE ZERO)
You will be directed to VIPERS OBSERVATION HANDLING TOOLS.
Select on the left hand side List of the Wx pointings (x is either 1 or 4 depending on the field).
Click on SUBMIT.
PLEASE NOTE THAT THE ACCESS TO THE SITE CAN BE VERY SLOW. PLEASE BE PATIENT IF YOU HAVE TO WAIT SOME TIME BEFORE GETTING ACCESS TO THE PAGE.
- Look for the pointing you have been assigned, click on the tarfile
in the PRE+IMG column. Save the tar file on disk. It will contain the 4 pre-imaging
WxPyyyQz.fits files, the four WxPyyyQz_cross.obj.txt
and the four WxPyyyQz.cat files, where x
refers to the field (either 1 or 4), yyy being the three-digit pointing number,
and z being the quadrant number (1, 2, 3, or 4). An example would be
W4P071Q3.fits, W4P071Q3_cross.obj.txt, W4P071Q3.cat.
ADVICE: To avoid confusion, create a separate directory for each pointing you are working on. During a VMMPS session many additional files are produced and they should be separately filed to allow easier access at a later stage.
The mask preparation is done separately for each quadrant and consists of four individual steps:
- 1. Data retrieval and setup.
2. Cross correlation and slit assignment
3. Creation of finding charts.
4. Data packaging and upload of the final mask files to the VIPERS web site repository.
1.2 VIPERS VMMPS CONFIGURATION FILES - NEW INSTRUCTIONS, MODIFIED ON OCTOBER 7th 2010:
Before starting VMMPS, please check that you have installed the proper configuration files.
As in the past, there is the spoc configuration file that you can retrieve HERE
The file name is vmmps_spoc_gui.tcl and you have to use this file to replace the file
<your_vmmps_installation>/lib/libvmmpsPlugins.tcl/vmmps_spoc_gui.tcl
where <your_vmmps_installation> is the root directory of your own VMMPS installation, such that you have the VMMPS executable in <your_vmmps_installation>/bin/vmmps
NEW, AS OF OCTOBER 2010 is the global configuration file that you can retrieve HERE
The file name is vmmps.cfg and you have to use this file to replace the file
<your_vmmps_installation>/config/vmmps.cfg
2. MASK CONSTRUCTION
2.1 VMMPS: CROSS CORRELATION
- Start VMMPS.
- Select from the VIMOS-MPS menu the "Cross Correlate Contributed
and VIMOS Pre-image catalogs" option. A new window is opened.
- Click "Select Contributed Catalog" and choose the
WxPyyyQz.cat file for e.g. Q1.
Click "Select VIMOS pre-image catalog" and select the WxPyyyQz_cross.obj.txt.
Click "Select the VIMOS pre-image file WxPyyyQz.fits" and load the WxPyyyQz.fits image into VMMPS.
HINT: Loading of the pre-image file will almost always produce an error message: close the error message window and repeat the pre-image selection process.
- Click on "Cross Correlate": a new window appears. Do "Run Cross"
with default parameters.
HINT: if the cross correlation fails (not even the red squares are shown) and all the selected catalogs/image refer to the same quadrant, there may be a problem with telescope pointing. In this case try overplotting the USNO catalog (from "Data-servers" menu of VMMPS), check if some objects are found and in case contact the VIPERS help desk vipers_hd@lambrate.inaf.it.
- Look at the values given as "Output of the CROSS program"
nref= no. of objects in the WxPyyyQz_cross.obj.txt file
ncross= no. of objects in the VIMOS catalog
nmatch= no. of objects initially matched between the two catalogs,using the given matching tolerance
r.m.s= rms of the cross correlation
Scroll the panel and see with how many objects the cross correlation ends up (usually less than initial nmatch) and with which rms, after the given number of iterations. Objects in the pre-imaging catalog are marked as red squares, and once they are matched with objects in the VIMOS catalog they are over-marked with green squares. Table 1 lists the colour coding used in the VMMPS cross correlation.
Table 1: Colour coding for the VMMPS cross correlation:
Object Class Symbol Objects in Pre-imaging Catalog squares Matched Objects (Pre-imaging with VIMOS catalog) squares
NOTE: The typical rms must be (at least) smaller than 0.35 arcsec. The no. of objects used must be no lower than 50. A low rms with a low number of objects may not be a good solution.
- Verify that the cross correlation is OK:
- Visually check ALL PARTS of the image, especially at the borders: red and green squares must be uniformly spread all over the image. If the green squares are distributed for example only in a diagonal pattern or only at the centre, the correlation is not good, no matter what the rms is.
- Green squares must be well-centered on the objects, even if the red squares may be a bit shifted (it may happen at the borders).
- Check that the rms is low (not greater than 0.35 arcsec).
- Check that nmatch is not much lower than nref (at least 50 objects must be used for cross correlation).
If results are not good, try changing the parameters and run again. If cross correlation is OK, click "Save VIMOS catalog" before quitting!
NOTE: the "Save VIMOS catalog" option produces a new version of the VIMOS catalog that will be used in the next step. Its name is WxPyyyQz_vm.cat.
- If you really cannot find what you think should be an acceptable
solution, it might be necessary to modify the World Coordinate System (WCS) info
stored in the pre-imaging files headers. To verify if this is indeed the case, open
the pre-imaging file with skycat, and overplot the USNO catalog objects over the image
(from the skycat menu Data-Servers, select Catalogs, and then USNO-A2 at ESO).
Measure the distance between the real objects and their expected positions (the center
of the overplotted light blue circles), in pixels. If the two differ, on average, by
20 or more pixels it will be necessary to adjust the WCS info in the preimaging file
header.
- To edit the WCS info, it is necessary to modify the value of the CRPIX1 and CRPIX2
FITS header keywords. To do this you need a FITS files
editor, like FV, the IRAF task hedit, or the VIPGI command line utility pipeHEdit,
but you CANNOT use a normal text editor !!!
As an example, if you have measured an offset of 30 pixels along the X axis and of 15
pixels along the Y axis between the true and the expected positions for the USNO catalog
objects, you need to decrease by these two amounts the current value of the CRPIX1 and
CRPIX2 keywords, respectively.
- If you still cannot find an acceptable solution, contact the VIPERS Team
for help vipers_hd@lambrate.inaf.it.
2.2 VMMPS: ASSIGN SLITS
- From the VIMOS-MPS menu select "Assign slits from a VIMOS
catalog/Produce ADP". Choose the newly-created
WxPyyyQz_vm.cat as a VIMOS
catalog. A window appears with the VIMOS catalog entries and some
buttons to flag objects. Selectable target objects (suitable for
slit positioning) are white circles on the image, forbidden objects
are yellow crosses. Additional suitable targets (possible QSOs) are indicated as
additional blue squares. Reference objects are marked as cyan polygons (see below).
Table 2 gives the colour coding for possible (valid) targets and forbidden objects.
Table 2: Colour coding for the VMMPS slit assignment:
Object Class Symbol Suitable Targets circles Forbidden Objects crosses Compulsory Targets (QSOs) squares Reference Objects polygons
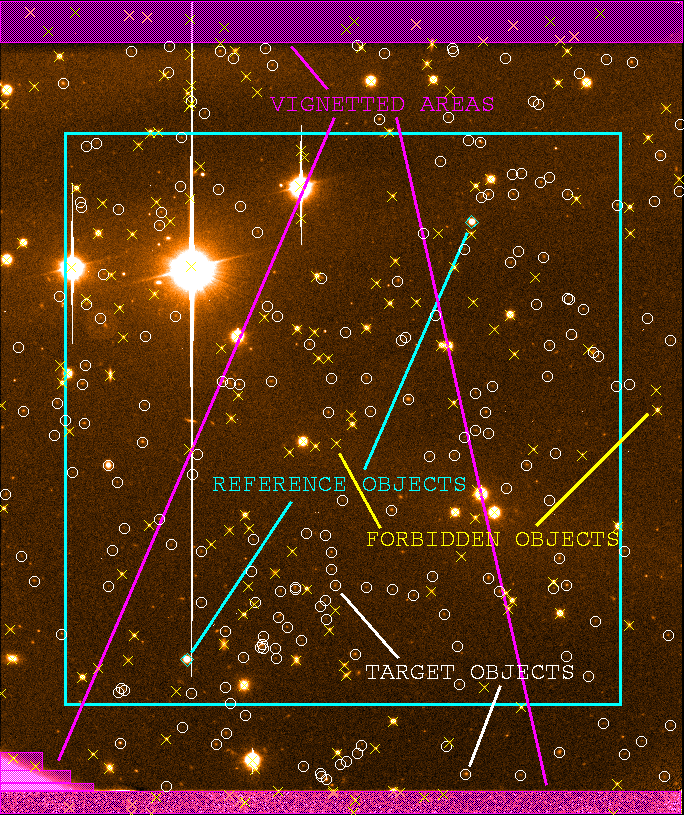
Figure 1: Example of a VIPERS VMMPS mask for Q3. Bad, vignetted areas that should be omitted for the target selection are indicated in magenta. Forbidden objects are shown as yellow crosses. The preferred (approximate) area for reference objects is indicated with a cyan box and the two selected reference objects are marked as cyan polygons. Suitable targets are indicated as white circles.
- Clip objects in bad regions of the CCD: At the image borders
there
are regions not illuminated/obscured, i.e. not usable to put slits
(f.i. bottom, top and left for Q1). Figure 1 shows these bad (vignetted)
regions for quadrant 3 as magenta areas. Note that the bottom left corner is
also affected by vignetting. Depending on the quadrant, the size and shape of
the bad regions do change. All selectable target objects in these regions
must be set to "forbidden" using the following procedure:
- Stretch the intensity levels to highlight the obscured regions.
- Highlight one selectable object in a obscured region and click on the "Forb" button to change its status. Its symbol changes to a yellow cross.
- Repeat one by one for all the selectable objects in obscured regions.
HINT: you can also do the same operation in a faster way. In the "catalog" window select Options->"set search columns". Choose X_Image from the right panel and click on the left arrow, so that X_image appears on the left panel. Repeat for Y_image and click OK. Now in the catalog window you have 2 additional boxes: Min_X_IMAGE and min_Y_IMAGE. fill such boxes with suitable values which you read from the image itself. Click on search. Now you will have the "white circles" only on the "good" part on the pre-image, i.e. your catalog has been "cleaned" from bad areas. Play with X_min,X_max,Y_min and Y_max until you are happy.
- Select reference objects (stars): Marked with cyan polygons by
clicking the "Ref" button.
- Two reference objects on each quadrant are sufficient.
- Try to select reference objects at opposite corners (or sides, i.e. upper or lower half) of the image.
- Select them among stars or compact objects with 16 < magnitude < 18.5.
- Avoid saturated and/or blended objects, or double objects.
- Targets should preferentially be forbidden objects.
NOTE: Do always check that the symbols are well centered over reference objects (that means the catalog position is well centered). Also try to choose them not too close to any image borders (2/3 of the diagonal from the image center to any image corner). The allowed (approximate) area for reference objects is indicated in Figure 1 with the cyan rectangle.
- Check compulsory objects (blue squares): There will be only a few compulsory
objects per quadrant. You do not have to do anything with them, but let VMMPS take full care of
them.
- Once you are happy with the above steps, click "Automatic slit
assignment": a new window appears with slit parameters. Values to be
used are:
-
Code method = Max_optimization
Grism = LR_Red
Slit width = 1.0"
Sky region = 1.8"
IMPORTANT: Never change values for "Low Cut","High Cut" and "number of masks".
NOTE: A CONFIGURATION FILE WITH DEFAULT VALUES FOR THE VIPERS SURVEY HAS BEEN CIRCULATED, USE THAT.
Click on "Assign slits" and check the summary. If you are not happy, click "Back to Changing FLAGS" to select f.i. different reference objects. If you are happy, click "Close and Save": yellow boxes mark those objects for which a slit has been put. Check slit positions with "Plot slits".
- VERY IMPORTANT:
Create the ADP by clicking "Make one final ADP".
A pop-up window appears saying that the "W1P116Q1_vm_LR_Red_M1Q1.adp" already exist:
"Do you want to save them?" CLICK ON YES.
- Verify that that slits are well centred over the targets. At the edges
and in the corners of the image (outside of the cyan rectangle in Figure 1),
the WCS might be slightly misaligned. In very rare cases a slit might not be
well centred over a target object, but be shifted by such a large amount that
the slit does not contain any part of the object at all. If you detect such
a rare case, please contact the VIPERS Team for further assistance
vipers_hd@lambrate.inaf.it.
NOTE:Beware also that the photometric catalog sometimes contains spurious detections. If you cannot see any hint of an object on the pre-image, avoid selecting it as a spectroscopic target.
- IMPORTANT:
If you are using VMMPS version 3.28: Make a copy of the
WxPyyyQz_vm.cat_tmp
file!
If you are using VMMPS version 3.24 omit this part.
- IMPORTANT: EXIT VMMPS.
3. FINDING CHART CONSTRUCTION
3.1 VMMPS: CREATE THE FINDING CHARTS
- IMPORTANT:
(Re-)start VMMPS.
In case you have VMMPS still running from the second step of the slit assignment, please exit VMMPS and re-start it!
- Use "Verify ADP file" in the VIMOS-MPS menu to plot the needed graphics.
- Select the ADP file to verify, e.g. "W4P071Q3_vm_LR_Red_M1Q3.adp".
- A pop-up window appears saying "Select the VIMOS pre-image" Click on "OK".
- Select the VIMOS pre-image WxPyyyQz.fits, e.g. "W4P071Q3.fits".
- The content of the ADP file is displayed over the pre-image. The yellow boxes mark those objects for which a slit has been put. Note that the objects of the pre-imaging catalog (white squares) are no longer displayed.
- Click on "Plot slits" to show the slit positions as white rectangles.
- In the finding charts, the yellow squares and white slits must be visible.
- Zoom out to display the full image size, e.g. scale of 1/3x.
- Adjust the contrast level. The contrast must be such that it is possible to see the target objects in their slits (at least the bright ones).
- In the VMMPS "File" menu click "Make Finding Chart".
- Enter all the relevant information as following:
RELEVANT FINDING CHART INFORMATION:- Run.ID: 182.A-0886
- PI Name: L.GUZZO
- List of OBs: Pointing name + quadrant, e.g. W4P001 Q1
- Band/Wavelength of this chart: R
NOTE: Make sure that the finding chart information is readable and does not obscure any slit position. Make also sure that the scale bar (2 arcmin) and the orientation of the image (N/E) is visible and does not obscure any slit position.
NOTE: The Skycat/VMMPS window must be completely within the screen and no other window overlapped otherwise the finding chart will not be OK.
- Click "Draw". If you are happy, then click on "Save to jpeg...". Use default B/W colour scheme.
- IMPORTANT: Close the ADP table and EXIT VMMPS.
- IMPORTANT: Change the default name of each of the four finding charts (which by default is something like 182.A-0886.001.jpg) into WxPyyy_Qz.jpg, as e.g. W4P071_Q2.jpg.
- IMPORTANT:
Check that the resulting finding chart is smaller than 1.0 MB.
If not, you need to re-do the finding chart by adjusting the grey level intensity (low and high intensity cuts) and create a new finding chart.
NOTE: A finding chart that is larger than 1.0 MB cannot be used and will be rejected during the automatic P2PP upload process.
4. PACKAGING AND UPLOAD
4.1 FILE PACKAGING AND UPLOAD
Once you have made the ADPs for all the four quadrants of your pointing:
- Place the 4 ADP files and 4 finding charts, one per quadrant, into a single tar file. The file name MUST adhere to the following naming convention: WxPyyy_mask.tar, where WxPyyy is the standard pointing name. Then gzip it, such that the final file will be, e.g., W4P071_mask.tar.gz.
- Place the 4 WxPyyyQz_vm.cat files, one per quadrant, into a single tar file. The file name MUST adhere to the following naming convention: WxPyyy_vmcat.tar, where WxPyyy is the standard pointing name. Then gzip it, such that the final file will be, e.g., W4P071_vmcat.tar.gz.
- Place the 4 WxPyyyQz_vm.cat_tmp files, one per quadrant, into a single tar file. The file name MUST adhere to the following naming convention: WxPyyy_tmp.tar, where WxPyyy is the standard pointing name. Then gzip it, such that the final file will be, e.g., W4P071_tmp.tar.gz.
- Upload the 3 gzipped tar files in the web site repository Masks->upload
ADPs
Send anyway an e-mail to vipers_hd@lambrate.inaf.it to indicate that you have completed your pointing, indicating the pointing name in the subject. If you have any questions, need help in the mask preparation, or have suggestions for improvements please contact the VIPERS Team at vipers_hd@lambrate.inaf.it.